Search Treasured MOM-ents

Showing posts with label baking. Show all posts

Thursday, April 17, 2014

Flaky Pie and Homemade Ice Creams.....

My friend finally took the plunge and decided to try teaching a new class at our neighbourhood.

She will be teaching brownie pizza (moist one!) for the kids and lead the adults to a 3 hour flaky pie and homemade ice cream class.


Instructor Profile: Kimberly is a red seal certified baker and pastry instructor with over 20 years of experience. She has worked with 5 star hotels including, The Sutton Place Hotel in Vancouver known for its Chocolate Buffet. She also worked in Asia for the Shangri-La Hotel and Mandarin Oriental Hotel chains.

Good Luck Kimberly


Sunday, April 07, 2013

Mini Candy Craze

It started with the DIY Sushi...

It tasted like gummy but looks like sushi...

Just mix the packs included and form them with the use of the moulds and VOILA!

* Fool Proof Sushi safe for the kids :)

...and it was so darn cute plus a chance to bond with Kimi

The Burger was easier. It was just stacking up the gummy included in the pack and putting the wafer bun on both ends... This set was cheaper too!
* Burger Jr.

Next, we found the ice cream kit that worked like a play dough with a small icing bag to make the ice cream swirls... The cones was included as is.

* Lukewarm Ice cream anyone?

The donut kit is fairly easy with just mixing and moulding to do the kit. It was really yummy and the icings were really a hit with the kids...

* Baker's Dozen

This next kit required the use of a microwave. We mixed the dough and put the in the microwave to bake :) Still easy and it came out so pretty and not to mention, yummy!

* Mini Two Tier Cake

It was weird to eat curry in miniature, knowing it was candy but tasting like curry and chicken nuggets. It was good though and Kimi liked her late night snack until it was all wiped out.

* Curry Good!

I wonder what our next candy adventure would be?

Till our next candy craft :)

Tuesday, July 03, 2012

Desserts for the Deserving

Being a frustrated baker (still), I read up a lot of baking blogs for tips and inspiration and one of the thing that caught my eyes and pulled on my heartstrings was an entry for a project that calls for volunteer bakers which aims to use baking to bring a bit of joy to somebody who deserves such a treat. This was founded last year, and because of it's success, they are doing it again this year.

To learn more CLICK HERE

I decided to sign up and requested to have a nominated person from Canada as a recipient of my...ahem- treat.

I got an email notifying me that I got a deserving person with a backgrounder as to why she deserves a little treat. She was nominated by her niece:

I would like to nominate my Aunt Jean*. She has given up her life to making sure that everyone around her is happy, but herself. She is always giving and never asks for anything in return. Her husband, and subsequently my uncle, has been diagnosed with leukemia, and my aunt has persevered and taken up all that she can and more to make sure that my uncle is comfortable. She works all day to make sure that her family is provided for, and as I said she never takes the time to look after herself. I think a reminder that she is important, and that there are people thinking of her, would do wonders for her spirit, and keep her moral high at a time when she is so run down.

* names changed to protect the privacy of the person

I wish I am a better baker to make a real treat for her but I ended up with Red Velvet Choco Crinkles because it was easier to ship things like cookies (and crinkles) to arrivr in one piece after shipping and because it was lighter, the shipping cost will be not that expensive as well. It still cost around $10 to ship a light package from Canada to Canada....

* Red Velvet Choco Crinkles
\
* Packaged with Styro to cushion the crinkles

* Lots of Love...

I hope that I was able to bring a smile with this small package of goodies.

Till next year's Dessert for the Deserving :).

* * * * *
DESSERTS FOR THE DESERVING II
2012

Thursday, June 07, 2012

Happy Spring :)

I finally got the breather I need.

I took out my baking supplies once again and tried my hand at making cupcakes just for Spring.


These were supposed to be a surprise for Kimi when she gets home from school.

...but Kenzo got to 3 cupcakes before Kimi even got home lol!

Friday, June 01, 2012

Behind the Red Velvet Cake

It was a day to celebrate a new Canadian, my sister in law, Sabrina.

She came for a short visit for her oath taking which will officially make her a Canadian Citizen.

...and because of that, I decided to try my hand once again in making a cake to commemorate the event.

Despite the kids running circles around me as I mix the cake batter and do the frosting while the cake was in the oven. I kept my fingers crossed because this is the second time I am attempting to do a two layer cake and with almost no practice in between, I wish that I will be able to pull off a cake that will be presentable and edible.

* Red (for Canada) Velvet Cake with Cream Cheese Frostings

I decided to run a short shower while Kenzo was still engrossed in his TV show, I was wondering why there was a long stretch of silence while I was drying up and found him cleaning up the beater.

* Portable Dishwasher

Celebration is never complete with a short meetup with friends over a meal. We chose Hanwoori Korean Restaurant for practical reasons. Sabrina's a busy gal and we had to meet her after the oath taking, before her flight for that same night!

* The Original Mommies- now complete

* After the meal... 

*...and before we separate and said our goodbyes

* * * * *
HANWOORI RESTAURANT
Burnaby, B.C.

again,
CONGRATULATIONS SAB :)

Thursday, March 29, 2012

Easter Inspired Carrot Cupcake

I am itching for Figaro's carrot cake and I can't get it here in Canada, I attempted to bake some and hope that it will suffice.

I decided to make an early Easter Inspired Carrot Cupcake. The flavor would be perfect for Easter, anyway, with the bunny usually used to symbolize the occasion.

I chose a recipe for Carrot cake here and tried the icing from this recipe.

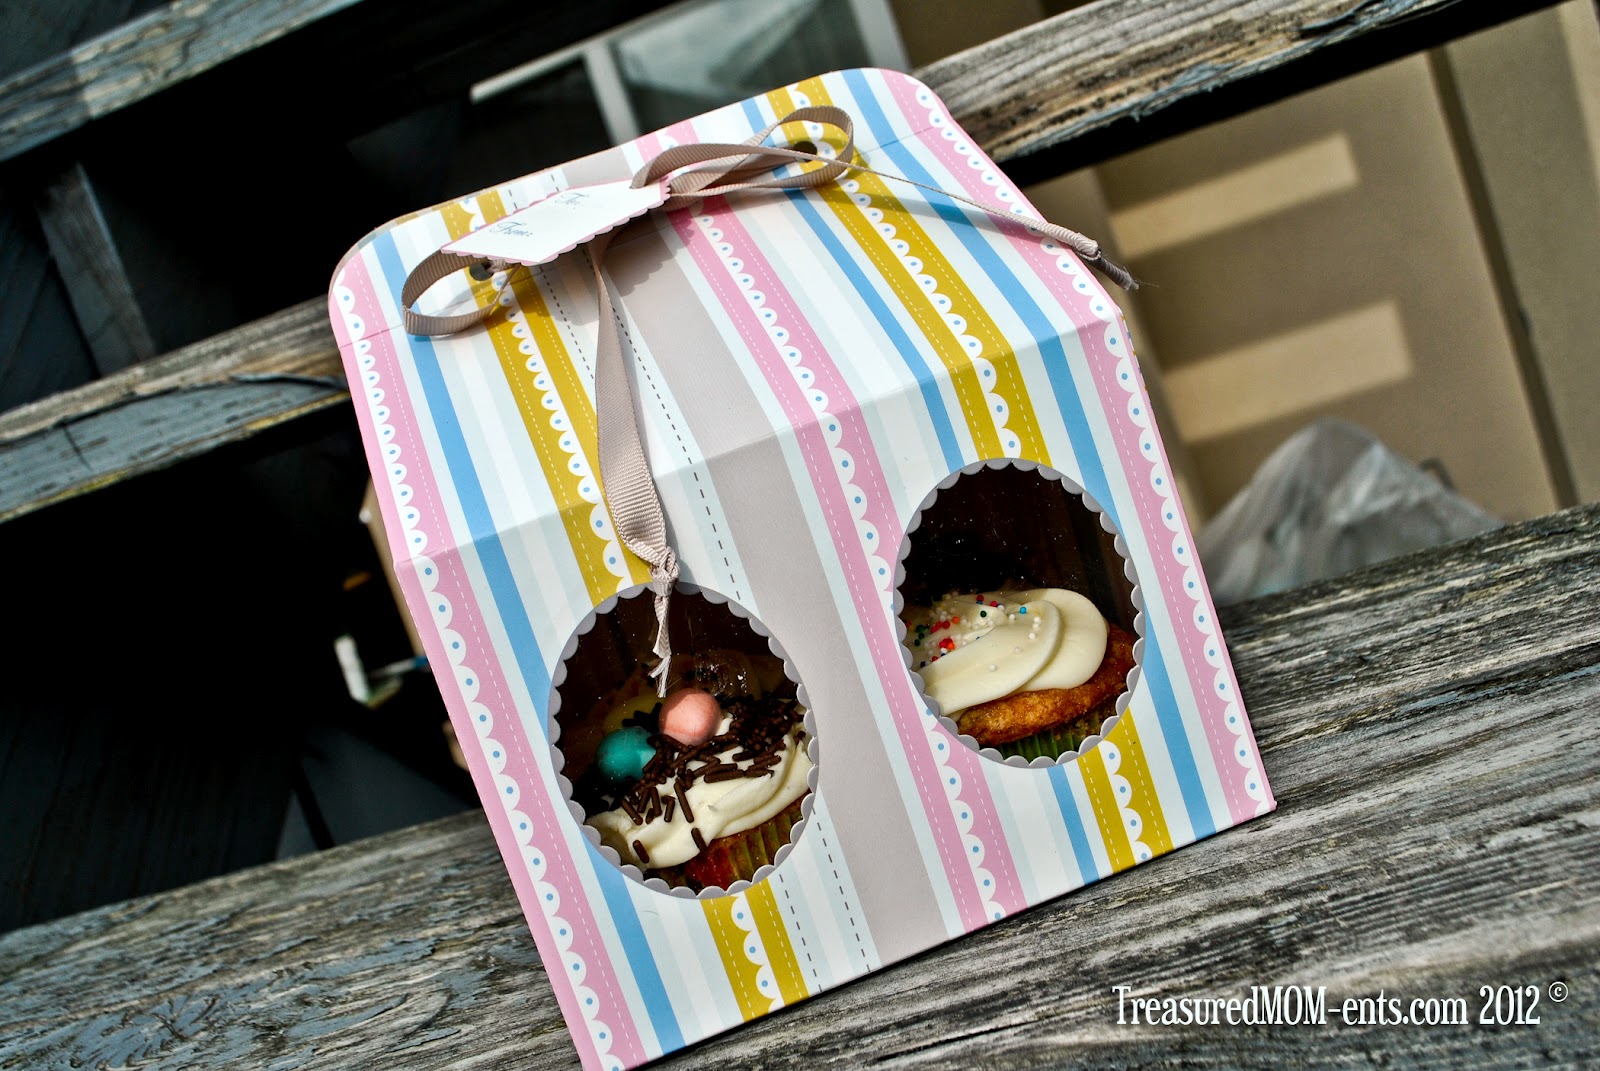
I got my chocolate sprinkles and Cadbury Mini Eggs to make my nest.
It's simple and cute.

* Easter Egg Nest 

I ran out of Mini Eggs and decided to alternate other cupcakes with colorful sprinkles.

* Colorful Sprinkles

I am so glad to get this cupcake box at a bargain in Marshall's when we went for a day trip in U.S.A. last weekend. It was the perfect box to house my Easter cupcakes and at a really good price too!

* Perfect box to house the little sweets

* Easter Nest Cupcakes in their natural habitat, no pun intended :)

...and as for the taste of my carrot cupcake,

* Look who we found with his hands in the cookie jar cupcake table

...if this is an indication

* I guess I passed the taste test in flying colors

* * * * *

HAPPY EASTER

...I am the resurrection and the life.
He who believes in me will live, even though he dies;
and whoever lives and believe in me will never die.

John 11: 25-26

Tuesday, March 27, 2012

Wilton Course 4- Completed!

This is the newest course which just debut on February 2012. I figured that since I already got the first three completed, might as well get the last one to complete it...-and finish I did! Thanks to hubby who took care of the kids every Tuesday so that I can go to my class and have my me time despite being tired from work himself.

* Course 4: Advanced Gum Paste Flowers

We were not given a book for this course (yet), it was a bit hard to follow the lessons with a xerox copy for reference but the instructor, Kim, did the best she could and we were able to do what was required every week.

* Lesson Course 4

I was not able to make it to the 3rd class :(. I had a valid reason though, but I wish I didn't have to miss that class. My in laws were going home and I had to stay home and look after the kids while they were driven to the airport for their vacation. 

Last day was about wire wrapping basically. We wrapped all the wires of flowers made during the first 3 weeks and we spent a good amount of our time doing that. After the wrapping, we assembled the Stargazer Lily petals and wrapped them to make them into a flower.

* Mel's Stargazer- The Classic Colors

* Mona's Stargazer- Color more on the Tiger Lily Variety

...then we were to assemble the flowers into a bouquet/ corsage for our final project.

We used up a lot of our time wrapping and only a couple of us were able to finish with a bouquet.

* Instructor Kim's Bouquet

* Charlotte's Bouquet

I had to make do with whatever flowers I had minus the 3rd class' flower so I only got a couple to work with. It was also hard working with this things because they are delicate and prone to breaking. Some of mine broke before the 4th class during drying period, while some of the students got theirs broken on the way to 4th class. It pays to be careful and make extra leaves/ flowers just in case. You could see a cringe on the students face every time one of their item drop and a sigh of relief when they discover that it did not break. 

* Mel's Bouquet

* * * * *
Far from what I once was
but not yet what I am going to be...


* * * * *
WILTON CLASS COURSE 4
Michael's Craft Store
Burnaby, B.C.

Tuesday, February 28, 2012

Wilton Course 3- Completed!

After a month of doing more flowers, we finally got to the last week to complete the 3rd course.

I never thought that I will be able to make a fondant and here I am making my 1st fondant cake ever!

* Scanned copy via Iphone

I actually thought that we wouldn't be required to make a cake this time after three weeks of doing gum paste and fondant decors but then the final week came and we were to bring another cake to cover for our final class.

It was a hectic week for me with Kimi getting better a few days then getting bad the next so I was rushing back and forth from the office then home to check on Kimi and Kenzo then back to the office. It just so happens that a co-worker is on vacation in the Philippines for 2 weeks which means that her work becomes my work.... You got the drift.

* Lesson Course 3

I was actually a bit skeptical if my cake would work as it has a huge crack in the middle. I got a wee bit excited turning the cake into a two layer and it was still a bit too early to do the flipping :(. Small things like this do happen, I guess, and my instructor inform me that we will try our best to salvage the cake and turn it into a fondant cake...

* Fondant layer with a bit of detail

I was breathing a bit more normal when I got the fondant covering my cake. Yey! 

I am so lucky that I got cake-mates that are way prepared than me with molds that they readily lent me so that I can make some details to go with my cake. Some even went so far as to offer me their extra flowers and leaves... :) 

Some of my peers brought in mini cakes that are way too cute...

* Mona's Mini Creation of Blues and Browns

* Erlinda's Mini Creation of Pink and Purples

Some opted to follow the instruction of baking an 8" cake :)

* Charlotte's Splash of Red Fondant

* Daphne's Whites and Pink Fondant

I guess Fiona is the most unique in her design, opting to make a completely different theme and not making any use of the flowers from our previous lessons.

* Fiona's Kite Flying Fondant

...and mine

* Waiting for Spring Fondant

P.S. The violets are actually contributed by Cake-mate Erlinda and leaves by Cake-mate Mona...
Stencils for the hearts in the center and the border, I borrowed from Cake-mate Charlotte. Daphne bought me the fondant to share for this class. 

Thank you :)
* * * * *

WILTON CLASS COURSE 3
Michael's Craft Store
Burnaby, B.C.


One vote a day will help me in a way :)
I entered a wee bit late so i am not expecting.

Tuesday, January 31, 2012

Wilton Course 2- Completed!

A few weeks of going back to Michael's every Tuesday night...

I have finally finished Course 2 of Wilton Decorating :) Yey!

* Scanned Copy via iphone...

Flowers, Flowers and more Flowers were taught in this class...

* Lesson Course 2

I am so happy to get a break and unleash another side of creativity with icings and something edible this time around.

My favorite was the final class that promises a culmination of all the things we have learned and put them in a piece of cake... It doesn't hurt that we get a certificate to bring home after ;)

* My Carrot Cake (Easy Bake = Ready Mix!)

We had to mark the cake to get an even space for the basket weave icing side we were about to make for this class

* Basket Weave, 1st Attempt :)

I used cream cheese icing for mine to complement the carrot cake.

I didn't realize that we were supposed to keep our flowers from the previous lessons for use this lesson, so I had to make another batch of flowers at home, which worked for me since I didn't want to use multi-colored flowers and opted for orange-y shade to match the carrot cake inside.

* Basket Weave side with Orange Royal Icings... 
Buttercream frosting for the leaves

* Top View: A sprinkle of violets to add more colors...

Cake-mates did just as well with their colorful rendition of their cakes :)

* Mona's Basketful of Flowers

* Erlinda's Warm Colored Flowers

* Fiona's Chocolate Cake with Blues and Yellows

* Wendy's Chocolate with A burst of color int he center

* Mel's Muted Cake... 

* * * * *
WILTON CLASS COURSE 2
Michael's Craft Store
Burnaby, B.C.

LinkWithin

Related Posts Plugin for WordPress, Blogger...